Thursday, 2 March 2017

Bugs' World!


It's been raining quite a bit lately, and the other day when we were on our way home after C's school, we spotted lots of snails who came out to play! It was perfect and cool after the rain had dissipated, and C was so thrilled to spend some time observing the beautiful nature around us!

C spotted a snail! We found a total of 8 snails that evening!

Seeing how excited C was, I was inspired to come up with some bug-themed activities to have fun and learn at the same time. :)


1. Make a Leaf Insect!


Many animals and insects have the ability to camouflage themselves, as a way of protecting themselves from predators. The leaf insect is one of these amazing creatures, and here, we came up with a simple activity to make your very own leaf insect! You will need:

- Leaf insect printout (available in the free printable at the end of this post)
- Pair of scissors
- Green straw (cut into 3 small pieces)
- 3 green pipe cleaners
- Glue

Cut out the leaves and apply glue
to attach the straws.

Adding the pipe cleaners as legs.

Push the pipe cleaners through the straws.
Great activity for fine motor skills too!

Giving the leaf insect a cute face!

C is pretty happy with her leaf insect!

2. Ladybug Fun!


This activity also involves some fine motor skills to create a beautiful ladybug! C used a hole puncher, scissors and some glue to give the ladybird black spots, antennae and legs! This kept her busy for a while. :)


C's pleased with her ladybird!

3. Decorate Your Butterfly

Use your imagination to decorate and create a lovely butterfly!


4. Bee Hive! 

A tracing and counting activity.


5. Match the Bug!

Reading and matching worksheet.


6. Shrink the Bugs!


Here we were inspired by a honey bee 'globe' C made at a farmers' market event.


C adored it and we decided to make our own garden 'globe' filled with flowers, glitter and more bugs! Here were the supplies we used:

Transparent plastic sheet from Daiso,
colourful sharpies and scissors to create
the bugs!

- Transparent plastic sheet (to trace the bugs from the free printable)
- Colourful Sharpie Pens
- Scissors 
- Clear Bottle
- Glitter
- Craft Flowers
- Super Glue
- Water
- Green decorative paper (to decorate the outside of the bottle, optional)

Step 1: Trace and colour the bugs on the plastic sheet. Cut them out.
C helped to draw the flowers onto the
plastic sheet!
Step 2: Place the cut plastic sheet onto foil on a baking tray. Bake at the recommended temperature. We did it at 130 degrees Celsius for around 80 seconds. The trick is to watch the process carefully. Stop once the shrinking has ceased.
Placing the bugs into the oven to shrink! C chose the ladybug,
butterfly and bee.
 Step 3. Glue the craft flowers onto the inside of the cover.
Glued the craft flowers onto the inside of
the bottle cover.

The shrunken bugs!
 Step 4: Add the glitter and your desired decorations into the empty bottle. Fill with water almost to the brim.
Adding the glitter.


Step 5: Place the shrunken bugs and watch them swim!
Placing the bugs!
 Step 6: Place the cover on tight and seal. Decorate the sides of the bottle if you wish. Invert and watch the magic!
Here's a glimpse of the ladybug swirling inside our garden globe!

Another view of our garden 'globe'! Can you spot the bugs?
Download the free printable for the activities above : Bug World!

Hope you enjoy the activities with your kids and let us all continue exploring the beautiful nature around us! :)


Do check out our related posts:

Sunday, 1 January 2017

Learning about Days of the Week, Dates, and Months of the Year!

Happy New Year everyone! May we all look forward to an even more amazing year ahead! Meanwhile, the most exciting thing happening this year is C officially starting school in a few days! I've been homeschooling her for the past couple of years, and it's been really enjoyable. However, now that she's turning five, it's time for her to commence her adventure in school... Meet new friends, learn in a classroom and gain different perspectives on her own.

A few important things that C has learnt at home are knowing the days of the week, dates and the sequence of months in a year. I started introducing these to her more than a year ago, and she knows them confidently now. So I thought it will be great to share how we did it! :)

Days of the Week Wheel. Teaches about Today,
Yesterday and Tomorrow.
At the start of every day, C will turn the wheel and tell what day today is, yesterday was, and what day tomorrow will be. It's a fabulous way to link the days of the week, as well as learn the sequence of the days.

I've come up with a simplified printable here: Days of the Week
You can print, laminate and use a brad to fasten the center of the wheel onto the base.

I printed out a simple calendar month of 31 days,
attached it to a white board, with a magnet marked "TODAY IS".

After turning the Days of the Week wheel, C will hop the magnet marked "TODAY IS" onto the correct date on the board. I used a generic calendar month with all 31 days. I will indicate to C the months that have 28, 29 (in a leap year), 30 or 31 days.

You can download the free printable here: DATES
You will need a magnet (mark it as TODAY IS) and a magnetic white board.
A list of Months in a Year. A bunny marks the current month.
When a new month arrives, C will hop the bunny marker to the
respective month.
C always looks forward to a new month, because that is when she gets to hop the bunny marker! :)

This was done to teach C the months in the year,
as well as their sequence. C learnt to read and place
the correct month according to their corresponding
numbers.
Read this post to download the free printable here: Months of the Year!

So there you have it! Hope you and your kids will find these useful in learning! And here's wishing all a wonderful 2017 ahead! :)

Friday, 11 November 2016

Supermarket Fun Game! :)

It's Saturday already! Yay! Hope everyone had a great week! Despite the wet weather this whole week, C and I managed to get out and play whenever the sun was out. It sure makes us appreciate the sunshine a lot more than usual! Hehe.

Look at C raring to go at the playground! Haha.

C had fun cycling too!
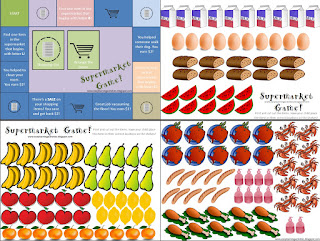
Meanwhile, on one of the days when we were stuck indoors, we came up with a supermarket game to have some fun while learning! :)

Supermarket Game!


C was excited to play the game!


This game includes:

- A Game Board
- Supermarket Items (like bread, milk, eggs, fruits, meat and seafood)
- Shopping Basket (Make Your Own Basket Activity)
- Supermarket Shelves
- Shopping Money
- Playing Cards


Game Board and Supermarket Items

Make Your Own Basket Activity and Supermarket Shelves
C helped to make her own shopping basket!


Shopping List and Arranging Cards (Playing Cards)

Shopping Money
This game allowed C to:

- Learn to read (shopping lists)
- Recognize and count items
- Search for items that begin with certain letters
- Practise her Scissor Skills (to make her own shopping basket)
- Calculate money (shopping money comes in denominations of $1 and $10)

To play the game, print, laminate and cut out the various supermarket items, playing cards and shopping money. You will also need:

- Dice
- Your own player token (anything that fits the game board will work!)


First, have your child arrange 5 of each supermarket item onto the correct shelves. Set aside the remaining supermarket items (A) on a separate area nearby.

Designate someone to be the customer and someone to be the cashier. The customer starts off with $25. The idea of this game is to roll the dice and move your token around the game board. When you land on a square with the shopping list icon, pick a card from the shopping list stack. Shop for the items on the list and place them in the shopping basket.
Shopping List Icon
If you land on a square with the shopping cart icon, pick a card from the arranging card stack. Read the card and help arrange the specific item from the remaining supermarket items (A) on to the correct shelf. 

Shopping Cart Icon
You also get chances to earn shopping money along the way! After each round, calculate the cost of the items in your shopping basket. For simplicity, everything was priced at $1 each. C was thrilled to be both the customer and cashier! Haha. :)

C as a customer.

C as a cashier! Haha.
Well, there are no hard and fast rules for this game. You can also come up with your own ways to play the game if you wish! Most importantly, have fun while learning! :)

We also came up with some Supermarket Math and Word Worksheets:


Here's wishing everyone a fun and enjoyable weekend ahead! :)

Saturday, 5 November 2016

Candy Fun, Candy Puzzle and Candy Shot Game!

Hope everyone is enjoying their weekend so far! Life's been sweet since Bites N Delights, fulfilling a baking passion deep inside! I had so much fun baking these Halloween treats last weekend, 

Halloween cookies by Bites N Delights!

and if your kids still have lots of candies from their trick-or-treating, the following candy-themed activities may be just for you! Free printable can be found at the end of this post! :)


Candy Fun!


Print out the candies and cut them out. Roll the dice and place the correct number
of candies in the candy jar!

This is a simple activity that just requires the print out and a roll of the dice. You can even use real candies if you'd like. The idea is for our kids to recognize the number of dots on the dice and place the correct number of candies into the candy jar! A fun way to reinforce counting! To make it more challenging, you can use two dice, and have your child add the dots on both of them! :) 


Candy Puzzle


For this candy puzzle, we jumble up the nine candy squares and ask our child to place them on the 3 x 3 grid such that when we add the number of candies in each row and column, they all add up to the same number! In this puzzle, they should all add up to 6.


Success! C is thrilled! Haha.


Candy Shot!


This fun game uses a balloon stretched over a paper roll to shoot candy targets to get points! Introduced C to numbers in a series of 10s (10, 20, 30, and 40, adding up to 100 points).

You need: Scissors, Balloon and Paper Roll.

Print out the candy targets and position them. Use the balloon
roll and shoot them down!


Take a look at the little video of C playing Candy Shot! :)

Hope you enjoyed the fun activities above! If you are keen, download Candy Fun!
Here's wishing everyone a lovely week ahead! :)


Meanwhile, do check out our related math posts: